In this tutorial, we will discuss how to use a segmentation camera sensor in Ignition Gazebo.
Requirements
Since this tutorial will show how to use a segmentation camera sensor in Ignition Gazebo, you'll need to have Ignition Gazebo installed. We recommend installing all Ignition libraries, using version Fortress or newer (the segmentation camera is not available in Ignition versions prior to Fortress). If you need to install Ignition, pick the version you'd like to use and then follow the installation instructions.
Setting up the segmentation camera
Here's an example of how to attach a segmentation camera sensor to a model in a SDF file:
<model name="segmentation_model">
<pose>4 0 1.0 0 0.0 3.14</pose>
<link name="link">
<pose>0.05 0.05 0.05 0 0 0</pose>
<inertial>
<mass>0.1</mass>
<inertia>
<ixx>0.000166667</ixx>
<iyy>0.000166667</iyy>
<izz>0.000166667</izz>
</inertia>
</inertial>
<collision name="collision">
<geometry>
<box>
<size>0.1 0.1 0.1</size>
</box>
</geometry>
</collision>
<visual name="visual">
<geometry>
<box>
<size>0.1 0.1 0.1</size>
</box>
</geometry>
</visual>
<sensor name="segmentation_camera" type="segmentation">
<topic>segmentation</topic>
<camera>
<segmentation_type>instance</segmentation_type>
<horizontal_fov>1.047</horizontal_fov>
<image>
<width>800</width>
<height>600</height>
</image>
<clip>
<near>0.1</near>
<far>10</far>
</clip>
</camera>
<always_on>1</always_on>
<update_rate>30</update_rate>
<visualize>true</visualize>
</sensor>
</link>
</model>
Let’s take a closer look at the portion of the code above that focuses on the segmentation camera sensor:
<sensor name="segmentation_camera" type="segmentation">
<topic>segmentation</topic>
<camera>
<segmentation_type>instance</segmentation_type>
<horizontal_fov>1.047</horizontal_fov>
<image>
<width>800</width>
<height>600</height>
</image>
<clip>
<near>0.1</near>
<far>10</far>
</clip>
</camera>
<always_on>1</always_on>
<update_rate>30</update_rate>
<visualize>true</visualize>
</sensor>
As we can see, we define a sensor with the following SDF elements:
<camera>: The camera, which has the following child elements:
<segmentation_type>: The type of segmentation performed by the camera. Use semantic for semantic segmentation. For panoptic (instance) segmentation, use panoptic or instance. The default value for <segmentation_type> is semantic.<horizontal_fov>: The horizontal field of view, in radians.<image>: The image size, in pixels.<clip>: The near and far clip planes. Objects are only rendered if they're within these planes.
<always_on>: Whether the sensor will always be updated (indicated by 1) or not (indicated by 0). This is currently unused by Ignition Gazebo.<update_rate>: The sensor's update rate, in Hz.<visualize>: Whether the sensor should be visualized in the GUI (indicated by true) or not (indicated by false). This is currently unused by Ignition Gazebo.<topic>: The name of the topic which will be used to publish the sensor data.
Label map & Colored map
The segmentation sensor creates 2 maps (or images):
- The
label map: For semantic segmentation, each pixel contains the object's label. For panoptic segmentation, each pixel contains the label and object's instance count.
- The
colored map: A colored version of the label map. In semantic segmentation, all items of the same label will have the same color. In panoptic segmentation, each pixel contains a unique color for each instance in the scene (so, for panoptic segmentation, items of the same label will not have the same color).
Assigning a label to a model
Only models with labels (annotated classes) will be visible by the segmentation camera sensor. Unlabeled models will be considered as background.
To assign a label to a model we use the label plugin in the SDF file:
<model name="box">
<pose>0 -1 0.5 0 0 0</pose>
<link name="box_link">
<inertial>
<inertia>
<ixx>1</ixx>
<ixy>0</ixy>
<ixz>0</ixz>
<iyy>1</iyy>
<iyz>0</iyz>
<izz>1</izz>
</inertia>
<mass>1.0</mass>
</inertial>
<collision name="box_collision">
<geometry>
<box>
<size>1 1 1</size>
</box>
</geometry>
</collision>
<visual name="box_visual">
<geometry>
<box>
<size>1 1 1</size>
</box>
</geometry>
<material>
<ambient>0 0 0.5 1</ambient>
<diffuse>0 0 1 1</diffuse>
<specular>0 0 0.3 1</specular>
</material>
<plugin filename="ignition-gazebo-label-system" name="ignition::gazebo::systems::Label">
<label>10</label>
</plugin>
</visual>
</link>
</model>
Lets zoom in the label plugin:
<plugin filename="ignition-gazebo-label-system" name="ignition::gazebo::systems::Label">
<label>10</label>
</plugin>
We assign the label of the model by adding the plugin to the model's <visual> tag. So, in this case, this model has a label of 10.
You can also attach this plugin to the model's <model> tag:
<model name="sphere">
<static>true</static>
<pose>-1 -2 0.5 0 0 0</pose>
<link name="sphere_link">
...
</link>
<plugin filename="ignition-gazebo-label-system" name="ignition::gazebo::systems::Label">
<label>20</label>
</plugin>
</model>
If you're including a model from a place like ignition fuel, you can add the label plugin as a child for the <include> tag:
<include>
<pose>-1 0 3 0.0 0.0 1.57</pose>
<uri>
https://fuel.ignitionrobotics.org/1.0/OpenRobotics/models/Construction Cone
</uri>
<plugin filename="ignition-gazebo-label-system" name="ignition::gazebo::systems::Label">
<label>30</label>
</plugin>
</include>
Running an example:
Now that we've discussed how a segmentation camera and models with labels can be specified, let's run an example world that uses the segmentation camera. Run the following command:
ign gazebo segmentation_camera.sdf
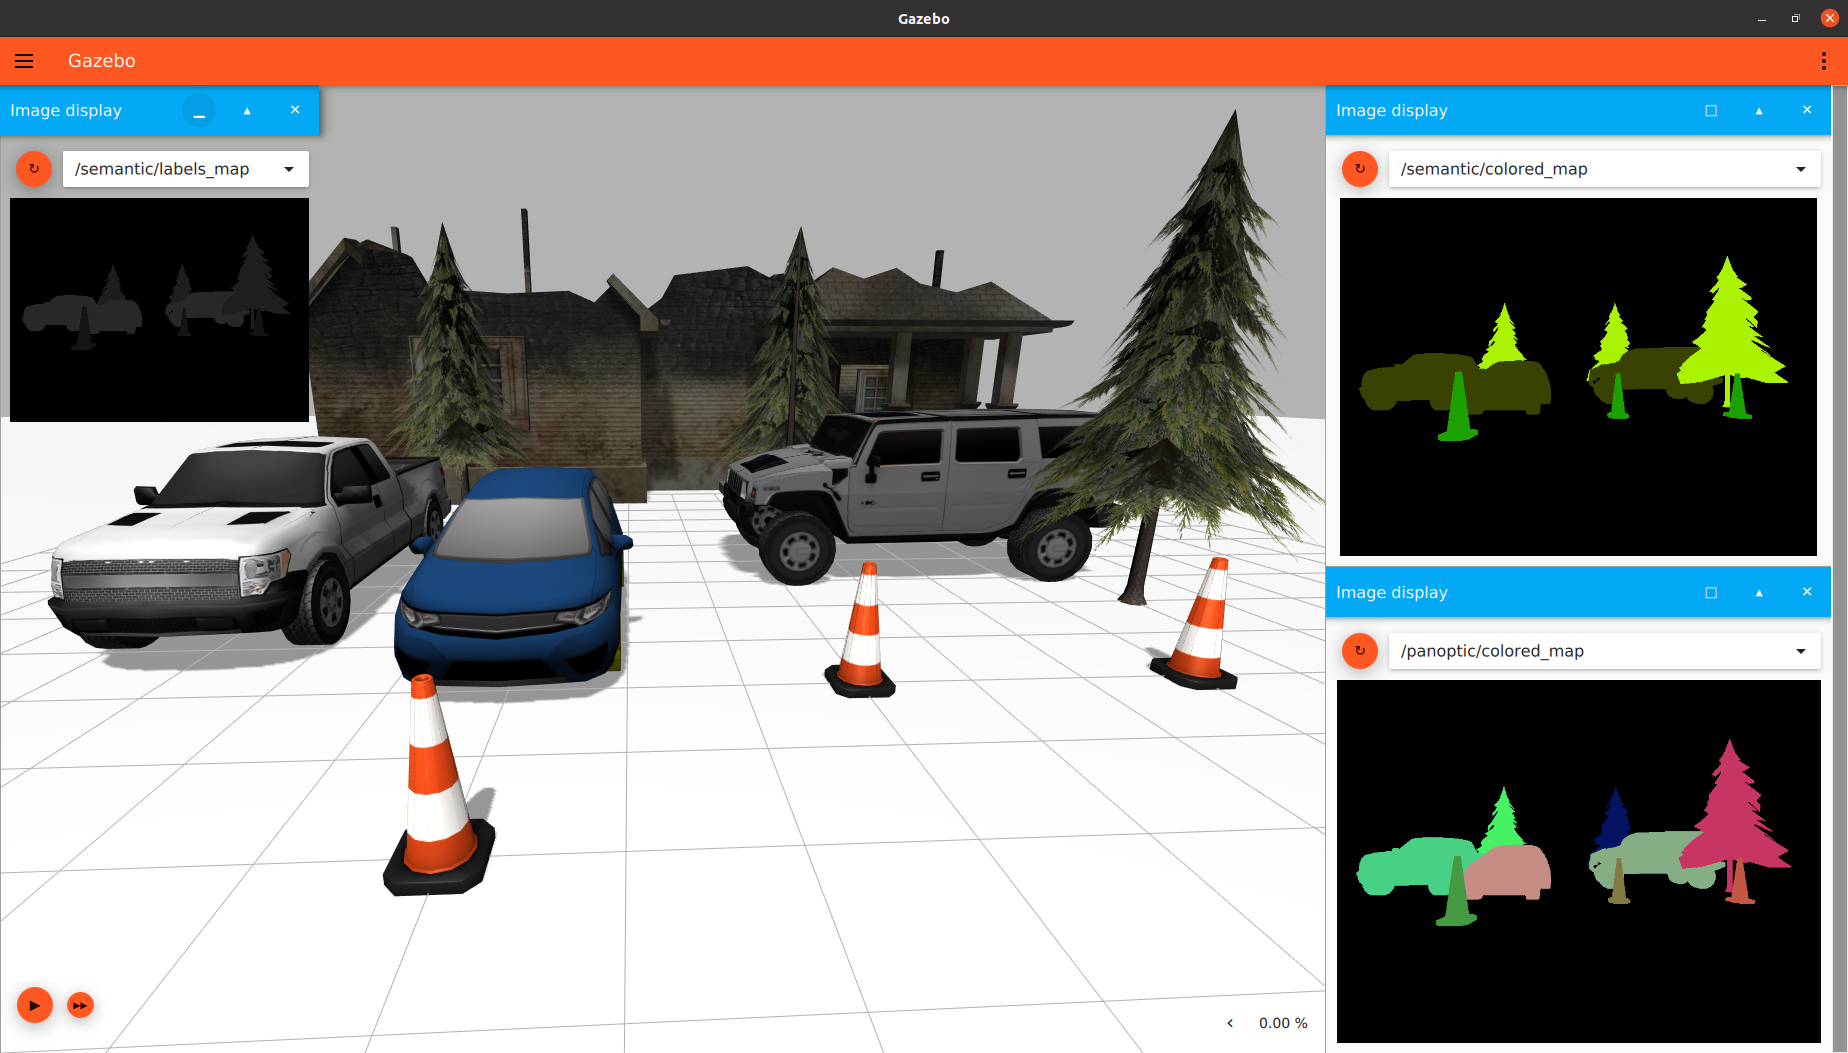
You should see something similar to this:
There are 2 segmentation cameras in the SDF world: a semantic segmentation camera, and an instance/panoptic segmentation camera.
For the instance/panoptic segmentation camera, colored map data is published to the panoptic/colored_map topic, and label map data is published to the panoptic/labels_map topic:
<sensor name="instance_segmentation_camera" type="segmentation">
<topic>panoptic</topic>
<camera>
<segmentation_type>instance</segmentation_type>
<horizontal_fov>1.57</horizontal_fov>
<image>
<width>800</width>
<height>600</height>
</image>
<clip>
<near>0.1</near>
<far>100</far>
</clip>
<save enabled="true">
<path>segmentation_data/instance_camera</path>
</save>
</camera>
<always_on>1</always_on>
<update_rate>30</update_rate>
<visualize>true</visualize>
</sensor>
For the semantic segmentation camera, colored map data is published to the semantic/colored_map topic, and label map data is published to the semantic/labels_map topic:
<sensor name="semantic_segmentation_camera" type="segmentation">
<topic>semantic</topic>
<camera>
<segmentation_type>semantic</segmentation_type>
<horizontal_fov>1.57</horizontal_fov>
<image>
<width>800</width>
<height>600</height>
</image>
<clip>
<near>0.1</near>
<far>100</far>
</clip>
<save enabled="true">
<path>segmentation_data/semantic_camera</path>
</save>
</camera>
<always_on>1</always_on>
<update_rate>30</update_rate>
<visualize>true</visualize>
</sensor>
Segmentation Dataset Generation
To save the output of the sensor as segmentation dataset samples, we add the <save> tag to the <camera> tag, and we specify the path to save the dataset in.
<sensor name="segmentation_camera" type="segmentation">
...
<camera>
...
<save enabled="true">
<path>DATSET_PATH</path>
</save>
</camera>
</sensor>
In the example world we just ran (segmentation_camera.sdf), you'll notice that the panoptic camera is saving data to segmentation_data/instance_camera, while the semenatic camera is saving data to segmentation_data/semantic_camera (these are relative paths).
Dataset Demo
Up to this point, we have left simulation paused. Go ahead and start simulation by pressing the play button at the bottom-left part of the GUI. You'll see the camera drop, capturing updated segmentation images along the way:
Once the camera has reached the ground plane, you can go ahead and close Ignition Gazebo. We will now discuss how to visualize the segmentation data that was just generated by Ignition Gazebo.
Visualize the segmentation dataset via Python
Put the following code in a Python script called segmentation_visualizer.py:
import cv2
import argparse
import os
import numpy as np
# Add the colored map to the image for visualization
def add_colored_to_image(image, colored):
return cv2.addWeighted(cv2.resize(image, (colored.shape[1], colored.shape[0]))
.astype(np.uint8), 1,
colored.astype(np.uint8), .5,
0, cv2.CV_32F)
# global labels map for mouse callback
labels_map = None
# Callback when you click on any pixel in the labels_map image
# Prints the label and instance count of the clicked pixel
def mouse_callback(event, x, y, flags, param):
if event == cv2.EVENT_LBUTTONDOWN:
# instance / panoptic
# label id
label = labels_map[y,x,0]
# instance count from the other 2 values of the pixel
instance_count = labels_map[y,x,1] * 256 + labels_map[y,x,2]
print(f'label: {label} .. instance count: {instance_count}')
cv2.namedWindow('labels_map')
cv2.setMouseCallback('labels_map', mouse_callback)
# Arg Parser to set the dataset path
parser = argparse.ArgumentParser()
parser.add_argument('--path', type=str, required=True, help='Segmentation Dataset Path')
args = parser.parse_args()
# dataset path
path = args.path
# paths of images folders
images_path = os.path.join(path, "images")
labels_map_path = os.path.join(path, "labels_maps")
colored_map_path = os.path.join(path, "colored_maps")
# list all images paths
images_names = sorted(os.listdir(images_path))
labels_names = sorted(os.listdir(labels_map_path))
colored_names = sorted(os.listdir(colored_map_path))
# add the root path to images names
images_paths = [os.path.join(images_path, name) for name in images_names]
labels_map_paths = [os.path.join(labels_map_path, name) for name in labels_names]
colored_map_paths = [os.path.join(colored_map_path, name) for name in colored_names]
for image_path, labels_path, colored_path in zip(images_paths, labels_map_paths, colored_map_paths):
image = cv2.imread(image_path, cv2.IMREAD_COLOR)
labels_map = cv2.imread(labels_path, cv2.IMREAD_COLOR)
colored_map = cv2.imread(colored_path, cv2.IMREAD_COLOR)
colored_image = add_colored_to_image(image, colored_map)
cv2.imshow("segmentation", colored_image)
cv2.imshow("image", image)
cv2.imshow("labels_map", labels_map)
cv2.imshow("colored_map", colored_map)
print("Press Any Key to Continue ... ESC to exit")
if cv2.waitKey(0) == 27:
break
cv2.destroyAllWindows()
Make sure you have all of the dependencies that are needed in order to run this Python script:
Run the script, setting the --path argument to what you specified for the <save> tag in the SDF file. Since we set the panoptic save path to segmentation_data/instance_camera, we'd run the following command to view the panoptic segmentation data:
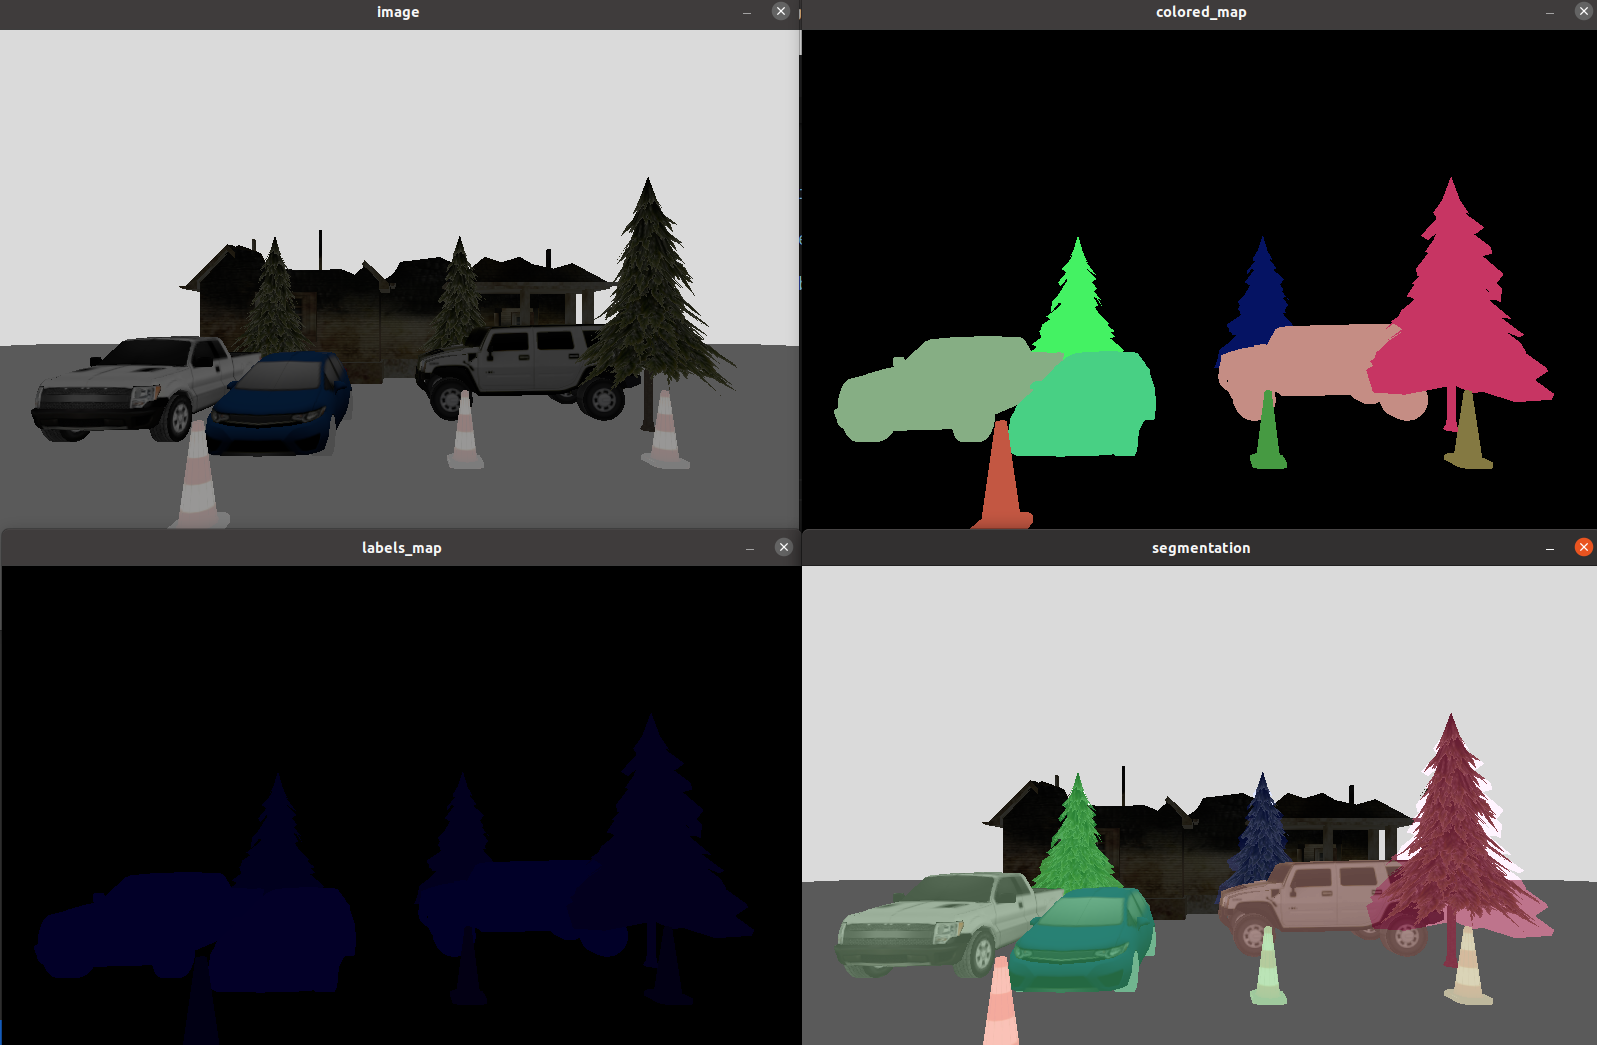
python3 segmentation_visualizer.py --path segmentation_data/instance_camera
You will see 4 windows: image, labels_map, colored_map, and colored_image (which is a combination of the image and colored_map).
For panoptic/instance segmentation, to parse the labels_map, click on any pixel on the labels_map window to see the label and instance count of that pixel.
Processing the segmentation sensor via ign-transport
It's possible to process the segmentation data in real time via ign-transport. You will need to which topics to subscribe to in order to receive this information.
Consider the following SDF snippet from the segmentation camera:
<topic>segmentation</topic>
In this scenario, the sensor data will publish the label map data to segmentation/labels_map, and the colored map data to segmentation/colored_map. We can write some c++ code that subscribes to these topics:
#include <cstdint>
#include <ignition/msgs.hh>
#include <ignition/rendering.hh>
#include <ignition/transport.hh>
void OnNewLabelMap(const ignition::msgs::Image &_msg)
{
auto width = _msg.width();
auto height = _msg.height();
auto buffer = _msg.data();
for (uint32_t i = 0; i < height; ++i)
{
for (uint32_t j = 0; j < width; ++j)
{
auto index = (i * width + j) * 3;
auto label = buffer[index + 2];
auto instanceCount1 = buffer[index + 1];
auto instanceCount2 = buffer[index];
auto instanceCount = instanceCount1 * 256 + instanceCount2;
}
}
}
void OnNewColoredMap(const ignition::msgs::Image &_msg)
{
auto width = _msg.width();
auto height = _msg.height();
auto buffer = _msg.data();
for (uint32_t i = 0; i < height; ++i)
{
for (uint32_t j = 0; j < width; ++j)
{
auto index = (i * width + j) * 3;
auto r = buffer[index];
auto g = buffer[index + 1];
auto b = buffer[index + 2];
}
}
}
int main(int argc, char **argv)
{
ignition::transport::Node node;
if (!node.Subscribe("/segmentation/colored_map", &OnNewColoredMap) ||
!node.Subscribe("/segmentation/labels_map", &OnNewLabelMap))
{
std::cerr <<
"Error subscribing to the boundingbox camera topic" return -1;
}
ignition::transport::waitForShutdown();
return 0;
}
If you'd like to gain a better understanding of how the subscriber code works, you can go through the ign-transport tutorials.