Simulating Autnomous Underwater Vehicles
Ignition now supports basic simulation of underwater vehicles. This capability is based on the equations described in Fossen's "Guidance and Control of Ocean Vehicles". This tutorial will guide you through the steps you need to setup simulation of an underwater vehicle. In this tutorial, we will guide you through the setup of the MBARI Tethys. One can find the final sdf file for this tutorial in the examples/worlds/auv_controls.sdf file.
Understanding Hydrodynamic Forces
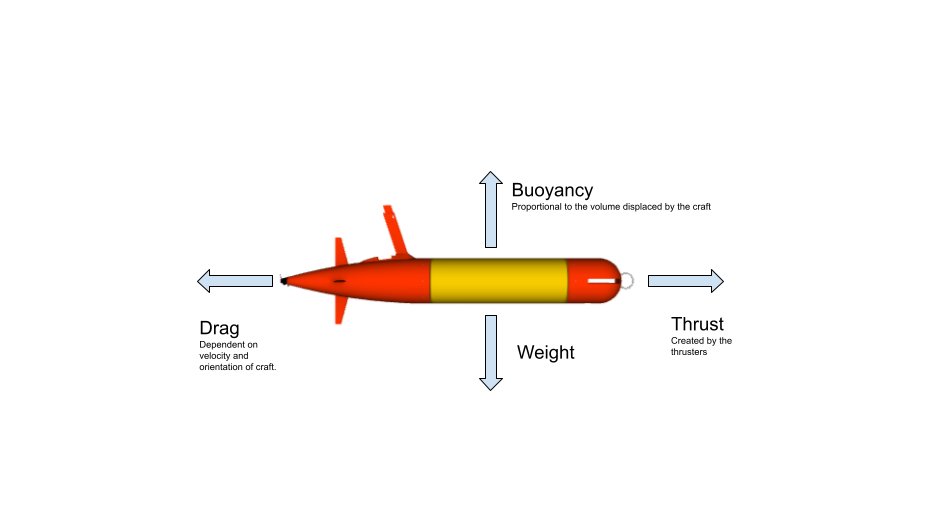
The behaviour of a moving body through water is different from the behaviour of a ground based vehicle. In particular bodies moving underwater experience much more forces derived from drag, buoyancy and lift. The way these forces act on a body can be seen in the following diagram: 
Setting up the buoyancy plugin
The buoyancy plugin in ignition uses the collision mesh to calculate the volume of the vehicle. Additionally, it needs to know the density of the fluid in which it is moving. By default this is set to 1000kgm^-3. However, in real life this may vary depending on many factors like depth, salinity of water etc. To add the buoyancy plugin all one needs to do is add the following under the <world> tag:
Setting up the thrusters
We need the vehicle to move, so we will be adding the Thruster plugin. The thruster plugin takes in a force and applies it along with calculating the desired rpm. Under the <include> or <model> tag add the following:
Now if we were to publish to /model/tethys/joint/propeller_joint/cmd_pos
we should see the model move. The thrusters are governed by the equation on page 246 of Fossen's book. In particular it relates force to rpm as follows: Thrust = fluid_density * RPM^2 * thrust_constant * propeller blade size^4. The plugin takes in commands in newtons. So if you have a different thrust curve you can still use the plugin with some type of adapter script. The thrust constant is normally determined by individual manufacturers. In this case we are using the Tethys's thrust coefficient. you may also build a test rig to measure your thruster's thrust coefficient.
Adding Hydrodynamic behaviour
You may notice that the robot now keeps getting faster and faster. This is because there is no drag to oppose the thruster's force. We will be using Fossen's equations which describe the motion of a craft through the water for this. For better understanding of the parameters here, I would refer you to his book. Usually these parameters can be found via fluid simulation programs or experimental tests in a water tub.
Control surfaces
Just like aeroplanes, an underwater vehicle may also use fins for stability and control. Fortunately, Ignition already has a version of the LiftDrag plugin. In this tutorial, we will simply add two liftdrag plugins to the rudder and elevator of MBARI's Tethys. For more info about the liftdrag plugin inluding what the parameters mean you may look at this gazebo classic tutorial. Essentially when we tilt the fins, we should experience a lift force which will cause the vehicle to experience a torque and the vehicle should start turning when we move.
The number in this case were kindly provided by MBARI for the Tethys. We also need to be able to control the position of the thruster fins so we will use the joint controller plugin.
We should now be able to wiggle the fins using the following command:
Testing the system out
To control the rudder of the craft run the following
To apply a thrust you may run the following command
The vehicle should move in a circle.
Ocean Currents
When underwater, vehicles are often subject to ocean currents. The hydrodynamics plugin allows simulation of such currents. We can add a current simply by publishing the following:
You should observe your vehicle slowly drift to the side.